
.jpg "Tibetan Local Travel Agency")


Guide to Solo Trek to Everest Base Camp in Nepal
Everest Base Camp (EBC) trek is a spectacular hike full of incredible scenery, amazing people, and unique history, and is possibly the most amazing two weeks you could spend on a vacation. Logistically speaking, it is not the hardest trek in Nepal, and if done properly, with the right preparation and a little caution, it can easily be done as a solo trek.
Travel documents for solo trekkers to EBC
Aside from the visa to get into Nepal, there are certain permits that are required for trekking at Everest. The most important requirement here is the TIMS Card. For safety, all trekkers in Nepal must acquire the Trekkers Information Management Systems (TIMS) Card before trekking. The TIMS Card is mandatory to ensure the safety and security of trekkers in the general trekking areas, and requires a copy of your passport, a passport-sized photograph, and the standard fee of US$20 per person, per trekking area.
 Card") Management Systems (TIMS) Card
Management Systems (TIMS) Card
A permit is also needed for the Everest area, which costs US$34 per person, and requires a photograph. Both TIMS and permit can be obtained at the tourist office in Kathmandu, which is just a short walk from Thamel, and is open six days a week until 2pm for the permit and 5pm for the TIMS Card. Processing normally takes around ten minutes for each, but if you do not have time in Kathmandu, you can also obtain both TIMS Card and permit in Monjo, on the route from Lukla to Namche Bazaar.
What to pack for solo trekker
If you are coming to Nepal without hiking gear, it’s easy enough to pick up decent clothing and supplies in Kathmandu. In Thamel, the main tourist area in Kathmandu, you can buy clothes for every occasion, and if you have the funds, there is even a real North Face store. Everest Base Camp is a relatively cold hike as you get higher up regardless of the season, so you will need to pack accordingly.
As with most cold weather hikes, layers are necessary. The long uphill hikes in the middle of the day will bring you down to a base layer, possibly even shorts and a short sleeve depending on the day, where the early morning hikes and stormy days will have virtually every part of your body completely covered. A thermal short sleeve shirt is a good idea, especially since you need to save weight in your bag. On top of the short sleeve, a breathable, lightweight long sleeve is enough to get you through the bulk of the trek in the warmer season.
 Trekking chothing
A down jacket makes a good top layer, but stay away from the fakes that you can find in many of the shops in Thamel. Go for something that is not a knock off, although it does not have to be branded. There are a lot of local shops that provide good quality for lower prices. If you’re visiting in the cold season you may want a sweater or fleece layer as well. Standard hiking pants should take care of your legs for the bulk of the trek, with waterproof snow pants coming in handy above Lobuche, depending on the weather.
Wool or smart wool socks are always a good idea, and at least two pairs would be wise in case one pair gets wet. If possible, bring some worn in boots instead of buying new ones in Kathmandu, if only to avoid blisters. If you do not have worn-in boots, buy them well in advance and take them out for a few local treks before heading for Nepal. A scarf or buff is a very handy item to have on the trail, both to keep your neck warm and free of sunburn, and to cover your face up high when it gets too cold to walk comfortably without one. A pair of good gloves or glove liners and a shell will take care of your hands, and a rain jacket or poncho is a wise move since it can rain at lower altitudes and snow up high any time of the year.
Sunglasses and sunscreen are necessities, even if you have darker skin like I do. The sun bearing down on a small patch of exposed skin at altitude for hours and hours of hiking every day will burn, and the sun reflecting off of the snow and glaciers will burn your eyes without any protection.
How to plan the trekking route and budget from Lukla to EBC
The trip to Everest is going to take a lot of planning and preparation. Just getting to Kathmandu is going to be very hard logistically, especially for those traveling from the U.S. or Europe. Planning out your flight routes, and then adapting for when airport situations do not go as planned can be tough. A few months ahead of time, you should also figure out and start collecting the things you need to pack along with you in your backpack. Ideally, the packing should be only the most essential items, and anything you do not actually NEED should be left behind. With all of the things you DO need on this kind of long-distance trek, you will not have room for non-essential items.
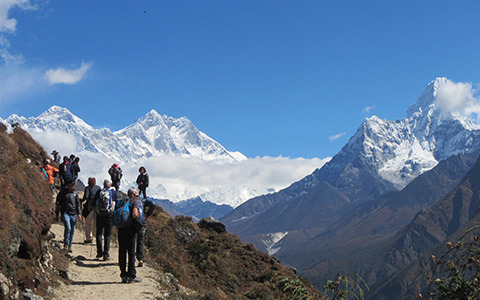
 Enjoying EBC solo trekking in Nepal
Planning the route is essential, and you should know where you are headed for each day, the distance you will be walking, how long it should take, and how high you will be climbing. The standard trek takes around 14 days to get to Everest and return, and the downhill part coming back is usually a lot faster than the uphill getting there. A basic itinerary of the trek should look a little like this:
Day 1: Lukla to Namche (9,150 feet / 2789m)
Day 2: Namche to Tengboche (12,700 feet / 3871m)
Day 3: Tengboche to Pheriche (14,340 feet / 4371m)
Day 4: Pheriche to Lobuche (16,210 feet / 4941m)
Day 5: Lobuche to Gorak Shep (16,942 feet / 5164m)
Day 6: Gorak Shep to Mount Everest Base Camp (17,600 feet / 5364m)
Day 6 continued: EBC through Gorak Shep, to Lobuche (16,210 feet / 4941m)
Day 7: Lobuche to Tengboche (12,700 feet / 3871m)
Day 8: Tengboche to Namche (9,150 feet / 2789m)
Day 9: Namche to Lukla (9,383 feet / 2860m)
The trek should also include several acclimatization days, where you can spend the day resting and getting used to the increase in elevation. How many of these you need depends on your own ability and how the altitude affects you, since it is often different for everyone each time they trek in high altitudes. However, a straight trek for nine days to get there and back is not recommended, as you run the risk of severe altitude sickness.
Money on the trip is essential, as there are very few places that accept credit cards, and ATMs are few and far between, and often empty. Some places in Kathmandu and Lukla will accept dollars, but it is best to get currency exchanged before you leave for Lukla, as few people in the mountains will accept foreign currency. The Nepalese Rupee (NPR) is the local currency, and you should make sure the bills are not higher than 500NPR denominations, as many places cannot change large bills. Make sure you bring enough for the whole trip, as well as the flight out afterwards, unless you are trekking out.
Other things to remember for planning the trip are:
1. Required travel insurance (the travel insurance should cover the cost of helicopter evacuation)
2. The current political situation of the country
3. Current visa requirements and costs
4. Read the information about altitude sickness (symptoms and causes)
5. Accommodation in Kathmandu
6. Tour Information and accurate itineraries
7. Weather conditions and best time for trekking depending on region (usually from February to April and October to November)
8. Current Information on the Trekkers Information Management System (TIMS) and fees – which forms, passport photos etc. are necessary for the application – if traveling alone for the trek is still possible, etc
9. First aid material (for blisters, etc.) and diverse medication (for altitude sickness, diarrhea. etc.)
10. Recommended vaccinations
>> Know more about Different Trekking Routes to EBC from Lukla
>> Know more about How to Budget Your Cost for EBC Trek in Nepal?
Best time to trek for solo trekker
Most people take on the Everest Base Camp trek during October and November, when the weather is the most pleasant and there is a better chance of clear skies. When you reach Everest Base Camp at this time of year there may not be any tents there, as the climbers and expeditions usually aim to summit in May. The benefit of this time of year is there are fewer trekkers on the trail, which means more room at the guesthouses, and a more peaceful trek to the heady heights of Mount Everest.
 There is a better chance of clear skies during October and November
The second best season is from April to the end of May and at this time, you will see the spring flowers and the yaks carrying up supplies for the climbers who summit Everest, and there will definitely be tents at Base Camp. This is the main high season for trekking to Everest, and the crowds of people can be extreme. If you are trekking at this time of year, you are likely to find very little accommodation at the guesthouses on the trail, so the latter part of the year is definitely better.
Do I need to hire a guide, Sherpa, or a porter?
There are various reasons both to hire a guide and/or porter, or not to, for virtually any trekker. While the standard route to Everest Base Camp (EBC) is generally easy to navigate without a guide, people do get evacuated due to altitude sickness relatively often, and it is easy enough to get lost if you venture off of the main trail when going via the passes or to a smaller town.
 Hire a porter in Nepal EBC trek
There are certain things to take into consideration when you think about whether to hire a guide or not, and the most important one is experience. If you have experience in trekking at altitudes above 5,000 meters, and have spent time in temperatures below minus ten degrees before, then the need for a guide is merely one of knowing where to go. And that can be decided with the addition of a good GPS system.
If you are not experienced in trekking at all, or have never done high-altitude trekking, then getting a guide may be of benefit to you. Ideally, solo trekking is not recommended for first-timers to Nepal, especially at the altitudes around Mount Everest. A guide will ensure you are safe and secure, and will be able to monitor your condition for altitude sickness, as well as knowing the route well and the best places to stop for the views and for sleep. There are other pros and cons of hiring a guide:
Pros
- Supporting a local economy that is generally financially poor
- Being shown the correct path, which is especially helpful in poor weather conditions
- Not needing to worry about a bed being available (guides book in advance)
- Potentially learning about the culture and area from your guide
- Being taught about how to properly deal with altitude and possible sickness
- Having a helping hand in case of an emergency
Cons
- A lack of independence, especially when joining a group tour
- Higher cost, generally double to quadruple compared with an independent trip
- A lack of self reliance and accomplishment compared with an independent trip
- Guides often choose inferior accommodation due to their relationships with lodge owners
- A lack of understanding your route and where you are due to reliance on an expert
- A feeling of regret due to the ease of finding the trail and organizing independently
Join-in Nepal Everest Base Camp Trekking Tours
Health concerns tips for solo trekkers and emergency plans
Altitude sickness, or AMS, is the main health concern in the Himalayas, and knowing the symptoms and being able to recognize them in yourself or others is very important. Make sure you read up on the symptoms of altitude sickness, and pack medication that can help. Always discuss medications with your local doctor before taking them.
Another thing to think about is daily health, and staying hydrated and well. Hiking at high altitudes is a heavy exertion on the body, and the exertion will make you sweat. Make sure you drink plenty of fluids, such as water and high glucose energy drinks, to remain hydrated and give you an energy boost along the way.
Insurance is a requirement for trekking in Nepal, and you should make sure that your insurance policy covers you for emergency evacuations by helicopter, just in case.
Mobile phones are now able to get a fairly good signal in the area, thanks to the two main Nepalese mobile carriers. Make sure you keep your cellphone charged, in case of the need to make emergency phone calls, and get the numbers for the emergency centers in Kathmandu and Lukla before you go. Also make sure that someone at home knows where you are, in case of emergencies for contact.
Being conservative is an important safety factor in solo trekking, and it is easy to forget how dangerous it can be in the high altitude regions. Be conservative in making your decisions, and if the weather, acclimatization, or your health are not what they should be, play it safe and turn around, descend, or take a rest. The mountains are unforgiving to those who make mistakes.

Ask a Quick Question

More Mount Everest Base Camp Travel Guide
 Mt.Everest Fact
- Everest Base Camp Nepal vs Everest Base Camp Tibet
- Mount Everest History and Its Famous Explorers
- The Difference of Mt.Everest in Nepal and Tibet
- Kathmandu to EBC Distance: how far and how to get to EBC in Nepal and Tibet from Kathmandu
- How Many Base Camps on Everest in Both Sides of Tibet and Nepal
 Everest Base Camp Tour Guide
- When is the Best Time to Visit Tibet Everest Base Camp in 2024
- When is the Best Time to Enjoy EBC Trek in Nepal
- The Best Hotel at Everest Base Camp in Tibetan Side
- Guide to Tibet Everest Base Camp Tour in Winter
- How to Get to Everest Base Camp (EBC) from Nepal?
- How to Get to Mount Everest Base Camp from Lhasa
- What Documents Do I Need for Everest Base Camp Tour in Tibet and Nepal?
 Everest Trekking Guide
- What to Pack for Everest Base Camp Trek
- Tingri to Everest Base Camp Trekking
- Everest Trek: Trekking Routes along The Gama Valley
- Everest Base Camp Trekking Maps in Tibet
- Ultimate Packing List for Everest Base Camp Trek in Tibet
- Best Trek in Nepal: Everest Base Camp Trek vs. Annapurna Circuit Trek
- Top 2 EBC Trekking Routes in Tibet
- EBC Trek in Tibet vs. EBC Trek in Nepal

Recommended Nepal Everest Base Camp Tour Packages
-
 Mount Everest Climbing Expedition in Nepal
Tour Route:Kathmandu - Lukla - Phakding - Namche Bazaar - Tengboche - Dingboche - Duglha - Lobuche - Everest Base Camp - Mount Everest - Lukla - Kathmandu
-
 10 Days Everest Panorama View Trek Tour
Tour Route:Kathmandu - Lukla- Phakding- Namche Bazaar- Khumjung- Tengboche- Monjo- Kathmandu
-
 17 Days Nepal Everest Base Camp Trek Tour
Tour Route:Kathmandu - Phakding-Namche Bazaar-Tengboche- Dingboche- Lobuche-Gorakshep- Everest base camp-Kathmandu
-
 26 Days Everest Panoramic Trek in both Nepal and Tibet
Tour Route:Lhasa - Gyantse - Everest Base Camp - Gyirong Border - Rasuwagadhi - Kathmandu - Lukla - Phakding - Namche Bazaar - Everest Base Camp - Lukla - Kathmandu
0 Comment ON "Guide to Solo Trek to Everest Base Camp in Nepal"